Unlike marketing emails, which are designed to promote products or services, transactional emails provide essential information and are triggered by user interactions. Examples include order confirmations, password resets, account notifications, and shipping updates. These emails are crucial for maintaining communication with users and ensuring they receive timely and relevant information about their transactions.
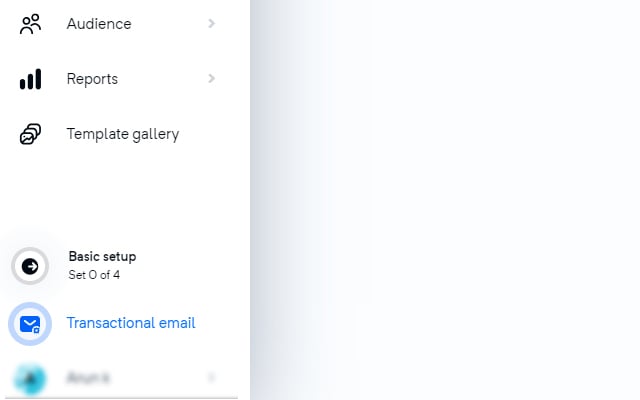
You can use the same Mailercloud panel for both transactional and marketing emails; you just need to switch the platform.
Log into the Mailercloud Panel: After logging in, you can easily switch between platforms.
Sidebar Button: Check the sidebar for a button that allows you to toggle between the marketing email platform and the transactional email platform.
The dashboard provides detailed metrics, including:
Sent Emails: Total count of emails sent.
Delivered Emails: Number of successfully delivered emails.
Bounced Emails: Count of emails that bounced.
Spam Compliance: Emails flagged for spam compliance.
Opened emails : Number of opened emails
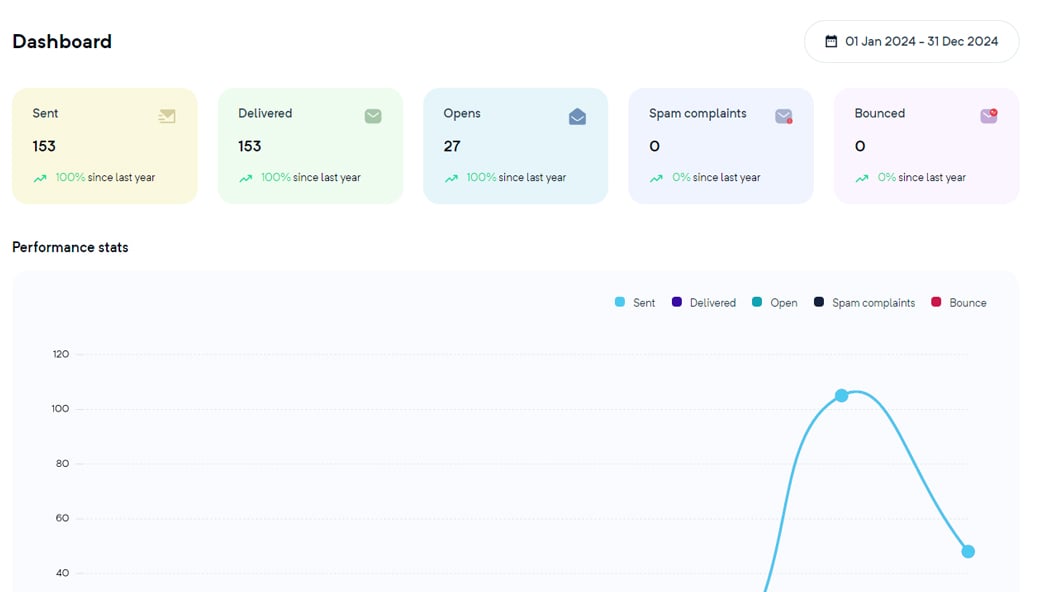
You can filter this data by date and view graphical representations for enhanced analysis.
All events including:
Sent
Delivered
Bounced
Process Failed
Expired
Spam Compliance
Opened

The system will support filtering and searching by subject, sender email, recipient address, event type, and date range. Additionally, there will be an export option that sends the data to our emails as a password-protected file.
To send emails using SMTP, follow these steps:
SMTP Server: Enter the address of your SMTP server. Example: smtp.yourservice.com.
Port: Specify the port number. Common ports:
587 for TLS
465 for SSL
Security: Select the security protocol:
TLS (Transport Layer Security)
SSL (Secure Sockets Layer)
Username: Enter the username for your SMTP account (typically your email address).
Password: Enter the password for your SMTP account.
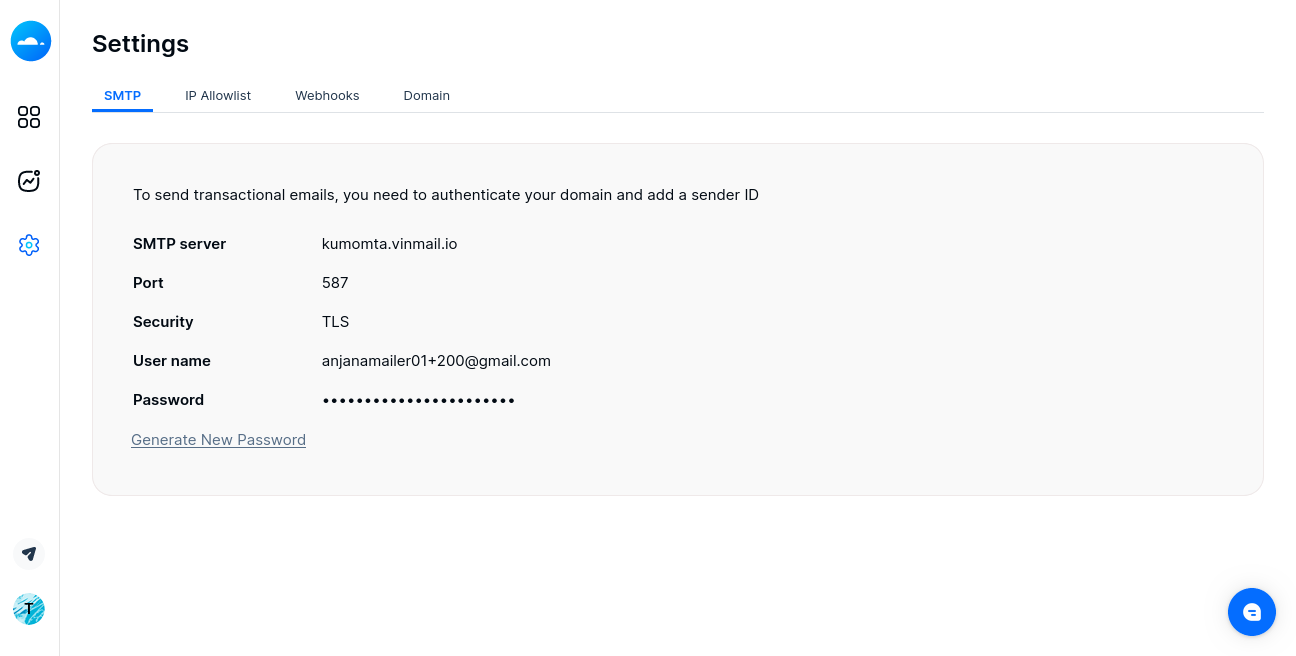
Once all details are correctly filled in, your system will be configured to send emails via SMTP.
To send emails using SMTP, you can use the following code snippets in various programming languages:
Node.js
// Import the nodemailer module to handle email sending
const nodemailer = require('nodemailer');

/**
 * Asynchronously sends an email using SMTP settings.
 * This function sets up a mail transporter with STARTTLS security and
 * sends an email to a specified recipient.
 */
async function sendEmail() {
    // Configure SMTP transporter
    let transporter = nodemailer.createTransport({
        host: 'your-smtp-host.com',  // Replace with your SMTP host
        port: 587,
        secure: false,              // true for 465, false for other ports
        auth: {
            user: '[email protected]', // Replace with SMTP username
            pass: 'password'             // Replace with SMTP password
        },
        requireTLS: true             // Enforce TLS as the security protocol
    });

   // Define email parameters
    let info = await transporter.sendMail({
        from: '"Sender Name" <[email protected]>',  // Sender address
        to: '[email protected]',                // List of recipients
        subject: 'Sample Email',                    // Subject line
        html: '<p>This is a sample email to test SMTP settings.</p>',  // HTML body content
        headers: {
            'mld-track-opens': 'false',              // Custom header for open tracking
            'mld-track-inbox': 'true',               // Custom header for inbox tracking
            'mld-track-campaign-id': 'test-node-threshold'  // Custom header for campaign ID
        }
    });


    // Log the result
    console.log('Message sent: %s', info.messageId);
}

// Trigger the sendEmail function to run
sendEmail();
Python
import smtplib
from email.mime.text import MIMEText
from email.mime.multipart import MIMEMultipart

def send_email(sender_email, username, password, recipient_emails, subject, body, html_content=None):
    """
    Send an email using the SMTP protocol with optional HTML content.

    Parameters:
    - sender_email (str): The email address from which the email is sent.
    - username (str): The username for SMTP server authentication.
    - password (str): The password for SMTP server authentication.
    - recipient_emails (list[str]): A list containing the recipient's email addresses.
    - subject (str): The subject line of the email.
    - body (str): The main content of the email in plain text.
    - html_content (str, optional): The HTML version of the email content.
    """

    # Initialize Multipart email
    msg = MIMEMultipart()
    msg['From'] = sender_email
    msg['To'] = ', '.join(recipient_emails)  # Convert list to comma-separated string
    msg['Subject'] = subject

    # Add custom headers
    msg.add_header('mld-track-opens', 'false')                # Custom header for open tracking
    msg.add_header('mld-track-inbox', 'true')                 # Custom header for inbox tracking
    msg.add_header('mld-track-campaign-id', 'test-node-threshold')  # Custom header for campaign ID


    # Attach HTML or plain text content
    if html_content:
        msg.attach(MIMEText(html_content, 'html'))
    else:
        msg.attach(MIMEText(body, 'plain'))

    # SMTP server configuration
    smtp_server = 'your.smtp.server'
    smtp_port = 587  # Use 465 for SSL if necessary
    SMTP_SECURITY = 'STARTTLS'  # Security protocol

    try:
        # Establish a connection to the SMTP server
        server = smtplib.SMTP(smtp_server, smtp_port)
        server.starttls()  # Start TLS encryption

        # Login to the SMTP server using provided credentials
        server.login(username, password)

        # Send the email
        server.sendmail(sender_email, recipient_emails, msg.as_string())

        # Close the SMTP connection
        server.quit()
        print("Email sent successfully")
    except Exception as e:
        print("Failed to send email:", str(e))

# Example usage parameters
sender_email = '[email protected]'
password = 'YourSecurePassword'
recipient_emails = ['[email protected]']
subject = 'Test SMTP Configuration'
body = 'This is the plain text body of the email.'
username = '[email protected]'

# HTML content specified as per user request
html_content = """
<!DOCTYPE html>
<html>
<head>
    <title>Email Test</title>
</head>
<body>
    <p>This is a sample email to test SMTP settings.</p>
</body>
</html>
"""

# Call the function with the parameters and HTML content
send_email(sender_email, username, password, recipient_emails, subject, body, html_content)
Ruby
# This script uses the 'mail' gem to send emails with both text and HTML parts using SMTP.
# It handles multiple recipients and includes basic HTML content for demonstration.

require 'mail'

# Configure SMTP settings with dummy data for public sharing. Replace these with actual credentials.
Mail.defaults do
  delivery_method :smtp, {
    address:              'smtp.yourserver.com', # SMTP server address
    port:                 587,                   # SMTP port
    user_name:            'username',            # SMTP username
    password:             'password',            # SMTP password
    authentication:       'plain',               # Authentication type
    enable_starttls_auto: true                   # Enable TLS automatically if available
  }
end

# List of recipients
recipients = [
  '[email protected]',
  '[email protected]',
  '[email protected]'
]

# Sending an email
begin
  Mail.deliver do
    from    '[email protected]'  # Sender email address
    to      recipients.join(',')      # Joining the recipient array into a single string
    subject 'SMTP Settings Test'      # Email subject

    # Add custom headers for tracking
    header 'mld-track-opens', 'false'                # Custom header for open tracking
    header 'mld-track-inbox', 'true'                 # Custom header for inbox tracking
    header 'mld-track-campaign-id', 'test-node-threshold'  # Custom header for campaign ID


    # Text part of the email
    text_part do
      body 'Hello, this is the text part of the email.'
    end

    # HTML part of the email
    html_part do
      content_type 'text/html; charset=UTF-8'
      body 'This is a sample email to test SMTP settings'
    end
  end

  puts "Email sent successfully!"
rescue StandardError => e
  puts "Error sending email: #{e.message}"
end
GO
// Package main defines an application that sends a simple HTML email.
package main

import (
    "fmt"
    "gopkg.in/gomail.v2"
)

func main() {
    // Create a new email message.
    m := gomail.NewMessage()

    // Set essential headers: sender, recipient, and subject.
    m.SetHeader("From", "[email protected]")
    m.SetHeader("To", "[email protected]")
    m.SetHeader("Subject", "Welcome to Our Service!")

    // Set custom headers for tracking purposes
    m.SetHeader("mld-track-opens", "false")              // Custom header for open tracking
    m.SetHeader("mld-track-inbox", "true")               // Custom header for inbox tracking
    m.SetHeader("mld-track-campaign-id", "test-node-threshold")  // Custom header for campaign ID


    // Define the HTML content of the email.
    m.SetBody("text/html", `This is a sample email to test SMTP settings`)

    // Configure the mail server connection with dummy credentials.
    d := gomail.NewDialer("smtp.yourdomain.com", 587, "[email protected]", "password")

    // Send the email, logging errors or success.
    if err := d.DialAndSend(m); err != nil {
        fmt.Println("Error:", err)
    } else {
        fmt.Println("Message sent successfully")
    }
}
Java
import javax.mail.*;
import javax.mail.internet.*;
import java.util.Properties;

/**
 * The SendMail class provides functionality to send emails using JavaMail API.
 * It uses SMTP server details to authenticate and send email messages to specified recipients.
 */
public class SendMail {

    public static void main(String[] args) {
        // Sender's email and password as placeholders (replace with actual credentials securely)
        final String username = "[email protected]";
        final String password = "your_password";

        // Setup mail server properties
        Properties props = new Properties();
        props.put("mail.smtp.auth", "true");
        props.put("mail.smtp.starttls.enable", "true");
        props.put("mail.smtp.host", "smtp.example.com");
        props.put("mail.smtp.port", "587");

        // Create a session with authentication
        Session session = Session.getInstance(props, new javax.mail.Authenticator() {
            protected PasswordAuthentication getPasswordAuthentication() {
                return new PasswordAuthentication(username, password);
            }
        });

        try {
            // Create a default MimeMessage object and set its fields
            Message message = new MimeMessage(session);
            message.setFrom(new InternetAddress("[email protected]"));
            message.setRecipients(Message.RecipientType.TO,
                    InternetAddress.parse("[email protected],[email protected]"));
            message.setSubject("Sample Subject");
            message.setText("This is a sample email content.");

            // Set custom headers
            message.setHeader("mld-track-opens", "false");            // Custom header for open tracking
            message.setHeader("mld-track-inbox", "true");            // Custom header for inbox tracking
            message.setHeader("mld-track-campaign-id", "test-node-threshold"); // Custom header for campaign ID


            // Send the message
            Transport.send(message);

            System.out.println("Message sent successfully");
        } catch (MessagingException e) {
            throw new RuntimeException(e);
        }
    }
}
PHP
<?php

require 'PHPMailer/src/PHPMailer.php';
require 'PHPMailer/src/SMTP.php';
require 'PHPMailer/src/Exception.php';

use PHPMailer\PHPMailer\Exception;
use PHPMailer\PHPMailer\PHPMailer;
use PHPMailer\PHPMailer\SMTP;

try {
    $mail = new PHPMailer(true);
    $mail->SMTPDebug = SMTP::DEBUG_SERVER;
    $mail->isSMTP();
    $mail->Host = 'your_host_address';
    $mail->SMTPAuth = true;
    $mail->Username = 'your_username';
    $mail->Password = 'your_password';
    $mail->SMTPSecure = 'tls';
    $mail->Port = 587;
    $mail->setFrom('your_email_address', "From Name");
    $mail->addAddress('recipient_email_address');
    $mail->Subject = "Your Email Subject";
    $mail->Body = 'This is a sample email to test SMTP settings.';
     $mail->CharSet = 'UTF-8';
    $mail->IsHTML(true);
    // Add custom headers
    $mail->addCustomHeader('mld-track-opens', 'false');  // Disable open tracking
    $mail->addCustomHeader('mld-track-inbox', 'true');   // Enable inbox tracking
    $mail->addCustomHeader('mld-track-campaign-id', 'test-node-threshold');  // Set campaign ID


    if (!$mail->send()) {
        echo 'Mailer Error: ' . $mail->ErrorInfo;
    } else {
        echo 'Message sent successfully!';
    }
} catch (Exception $e) {
    echo "Message could not be sent. Mailer Error: {$mail->ErrorInfo}";
}
To create a new password for transactional emails click “Generate new password”
Note: Once a new password is generated, the old password will no longer be valid.
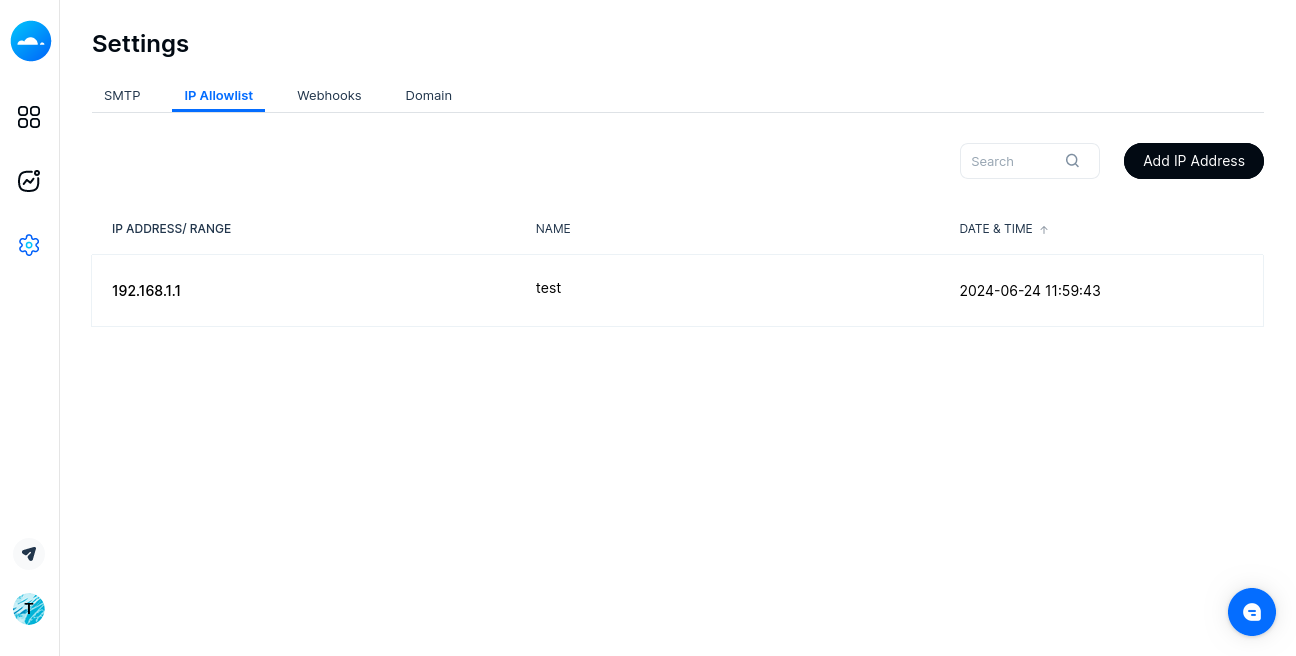
Control which IP addresses are permitted to send transactional emails by specifying Allowed IPs. If no IPs are specified, all IP addresses are allowed by default.
Single IP: Enter a single IP address (e.g., 192.168.1.1).
IP Range: Specify a range using a hyphen (e.g., 192.168.1.1-192.168.1.10).
Wildcard Range: Use an asterisk (*) as a wildcard (e.g., 192.168.1.*).
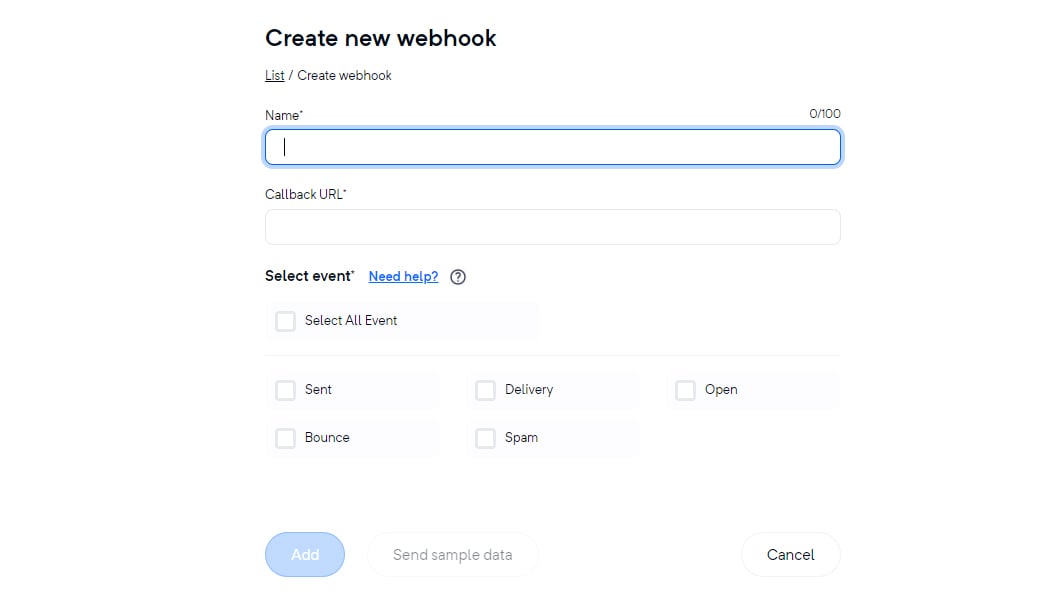
Receive real-time notifications about the status of your transactional emails. Supported event types include:
Sent
Delivery
Bounce
Spam
Open
The Domain tab displays a list of domains supported for transactional emails along with their DNS authentication status. This information is crucial for ensuring deliverability and security.

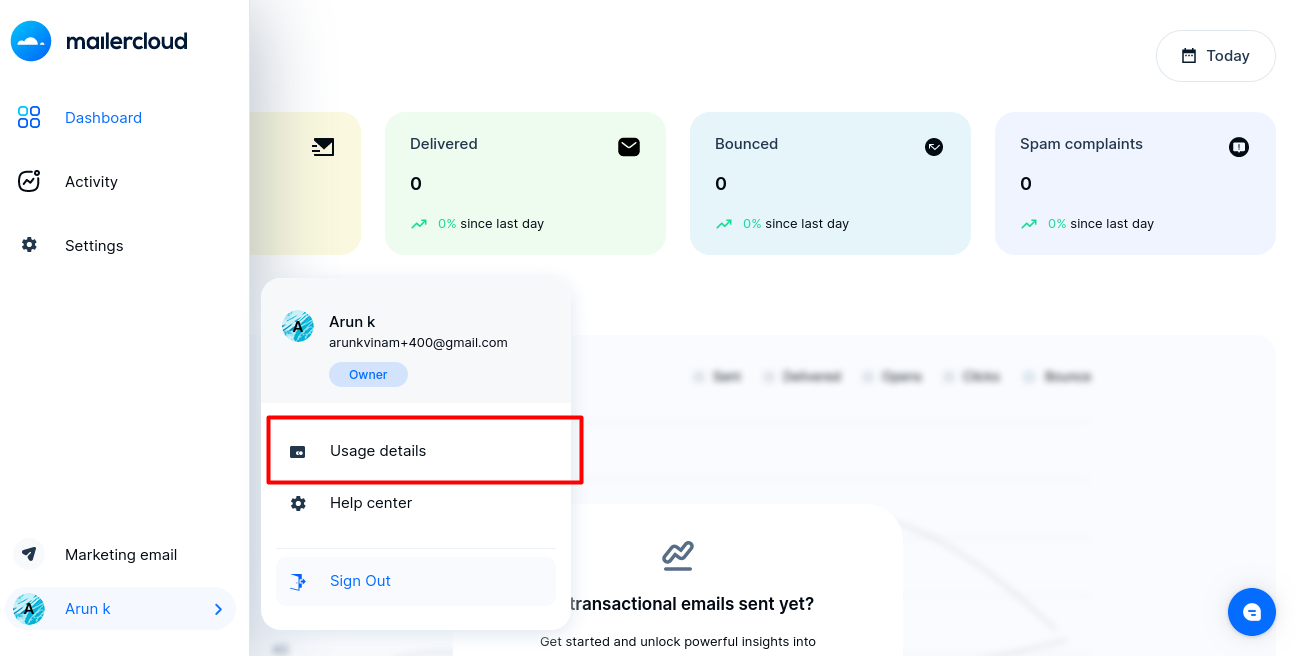
The transaction email usage page link is located at the bottom of the left sidebar for quick access.
Displays the number of transactional emails sent from your account each day, helping you monitor and manage your email sending activities.

Provides an overview of your current plan's email usage, including:
Total emails sent
Remaining emails available
Additional usage charges (if applicable)
Indicates when your current plan will expire. Monitor this date to ensure uninterrupted service. Find information on how to renew your plan or upgrade if needed.