The unsubscribe page is the branded screen a contact lands on when they click the unsubscribe link in one of your emails. In Mailercloud you control how this page looks — your logo, colours and wording, including the text on its buttons — and which departure reasons the contact can choose from. Every reason a contact selects is captured and reported back to you, so you can understand why people leave your list and improve future campaigns.
Make your edits in the left-hand panel, watch the live preview update on the right, and then click Save changes.
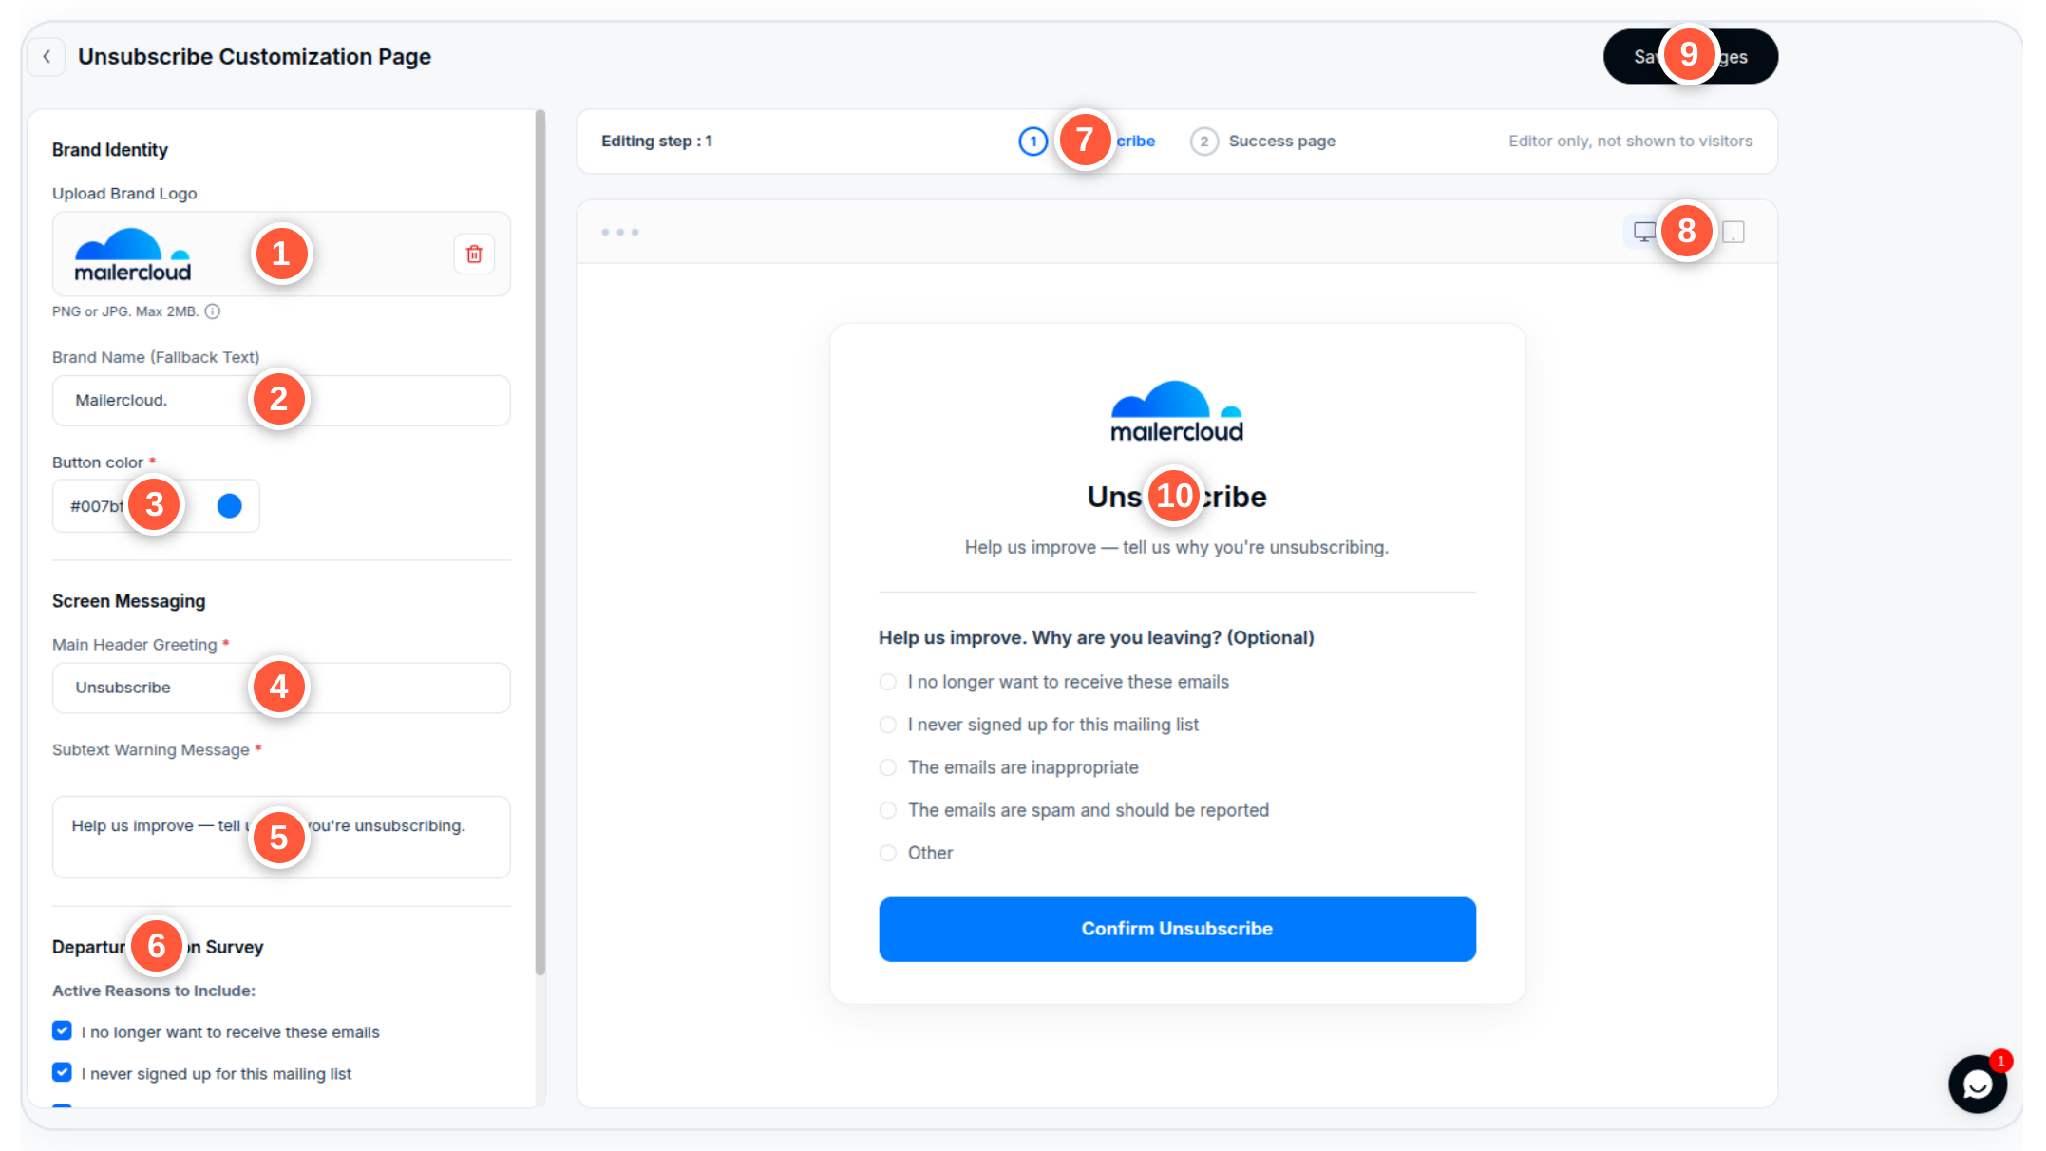
1. Upload Brand Logo — Add your company logo (PNG or JPG, max 2 MB). It appears at the top of the page. Transparent PNGs look best; surrounding empty space is trimmed automatically. Use the trash icon to remove it.
2. Brand Name (Fallback Text) — Shown when no logo is uploaded (it is also the logo’s alt text). Set it to your company or product name.
3. Button colour — The accent colour of the page’s action button (e.g. Confirm Unsubscribe). Pick it with the swatch or paste a hex value (e.g. #007bff).
4. Main Header Greeting — The large heading at the top of the page — e.g. Unsubscribe.
5. Subtext Warning Message — A one-line message under the heading — e.g. Help us improve — tell us why you’re unsubscribing.
6. Departure Reason Survey — Tick which reasons appear in the optional “Why are you leaving?” survey. These are the reasons that power the analytics in Part 2.
7. Editing steps (Unsubscribe / Success page) — Switch what you’re editing: Step 1 · Unsubscribe (the first screen) and Step 2 · Success page (the confirmation shown after opt-out). Each has its own heading, message and button text.
8. Device preview — Preview the page on Desktop, Mobile or Tablet.
9. Save changes — Saves your customisation. Required fields (marked *) must be filled in first.
10. Live preview — A real-time preview of the page — logo, heading, subtext, reason survey and button — updating as you edit.
Step 1 · Unsubscribe. The first screen a contact sees: logo, heading, subtext, the optional reason survey and the Confirm Unsubscribe button.
Step 2 · Success page. The confirmation shown after a contact opts out — its own heading and message, plus an optional Resubscribe button. Switch to it with the Success page tab.
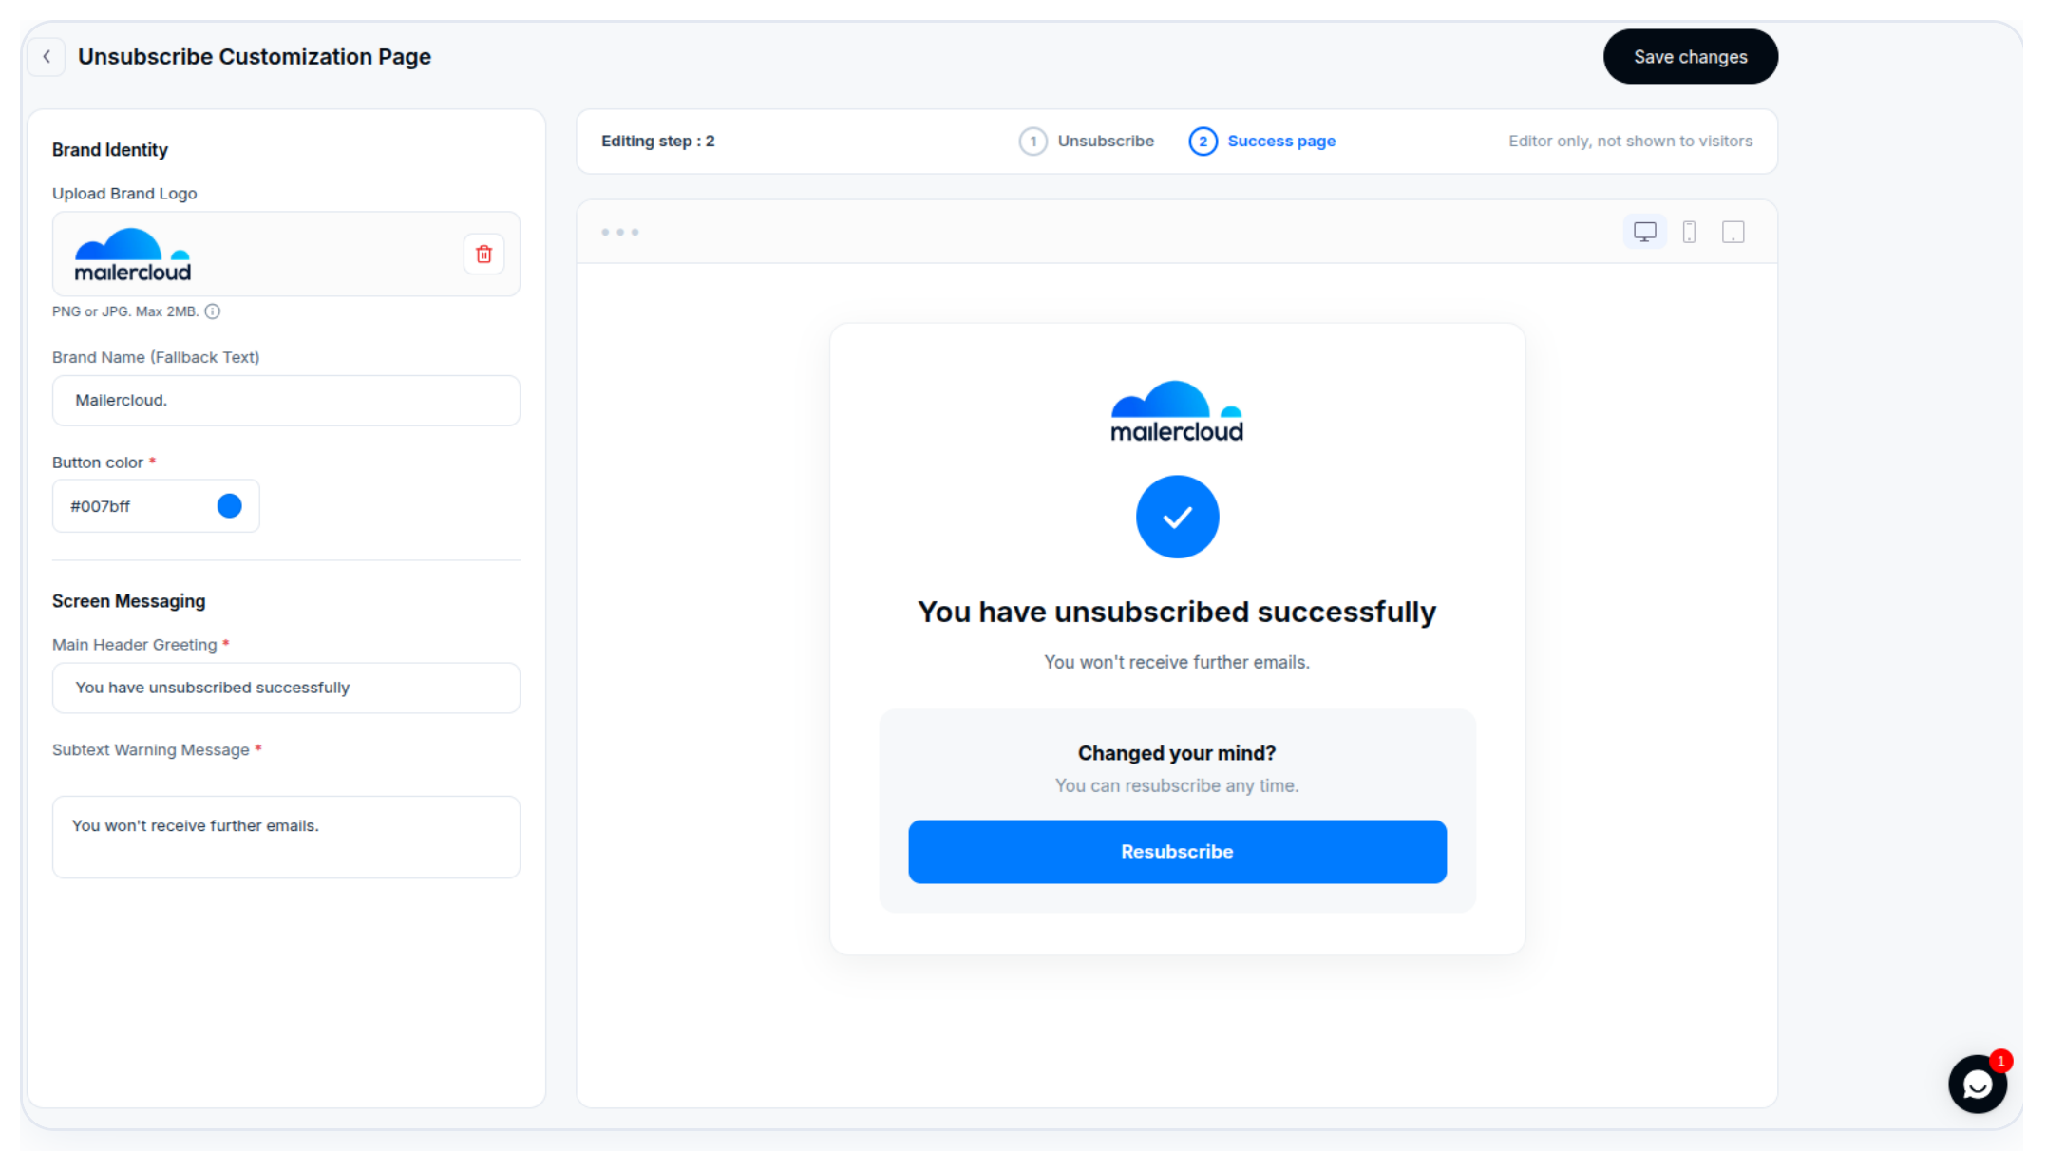
Step 2 · Success page — edit its heading and message the same way; the preview shows the confirmation with a Resubscribe option.
Each page has its own button, and you can change what it says:
Step 1 · Unsubscribe → Unsubscribe Button Text — the label of the confirm button (default Confirm Unsubscribe).
Step 2 · Success page → Resubscribe Button Text — the label of the Resubscribe button (default Resubscribe). The same label is used on the page shown to contacts who are already unsubscribed.
Both are required, can be up to 100 characters, and update in the live preview as you type. Long text wraps onto more lines inside the button. If you never change them, your page keeps the default labels.
Every reason a contact picks on the unsubscribe page is reported back to you in two places, so you can see why people opt out and act on it: per campaign, and across your whole account.
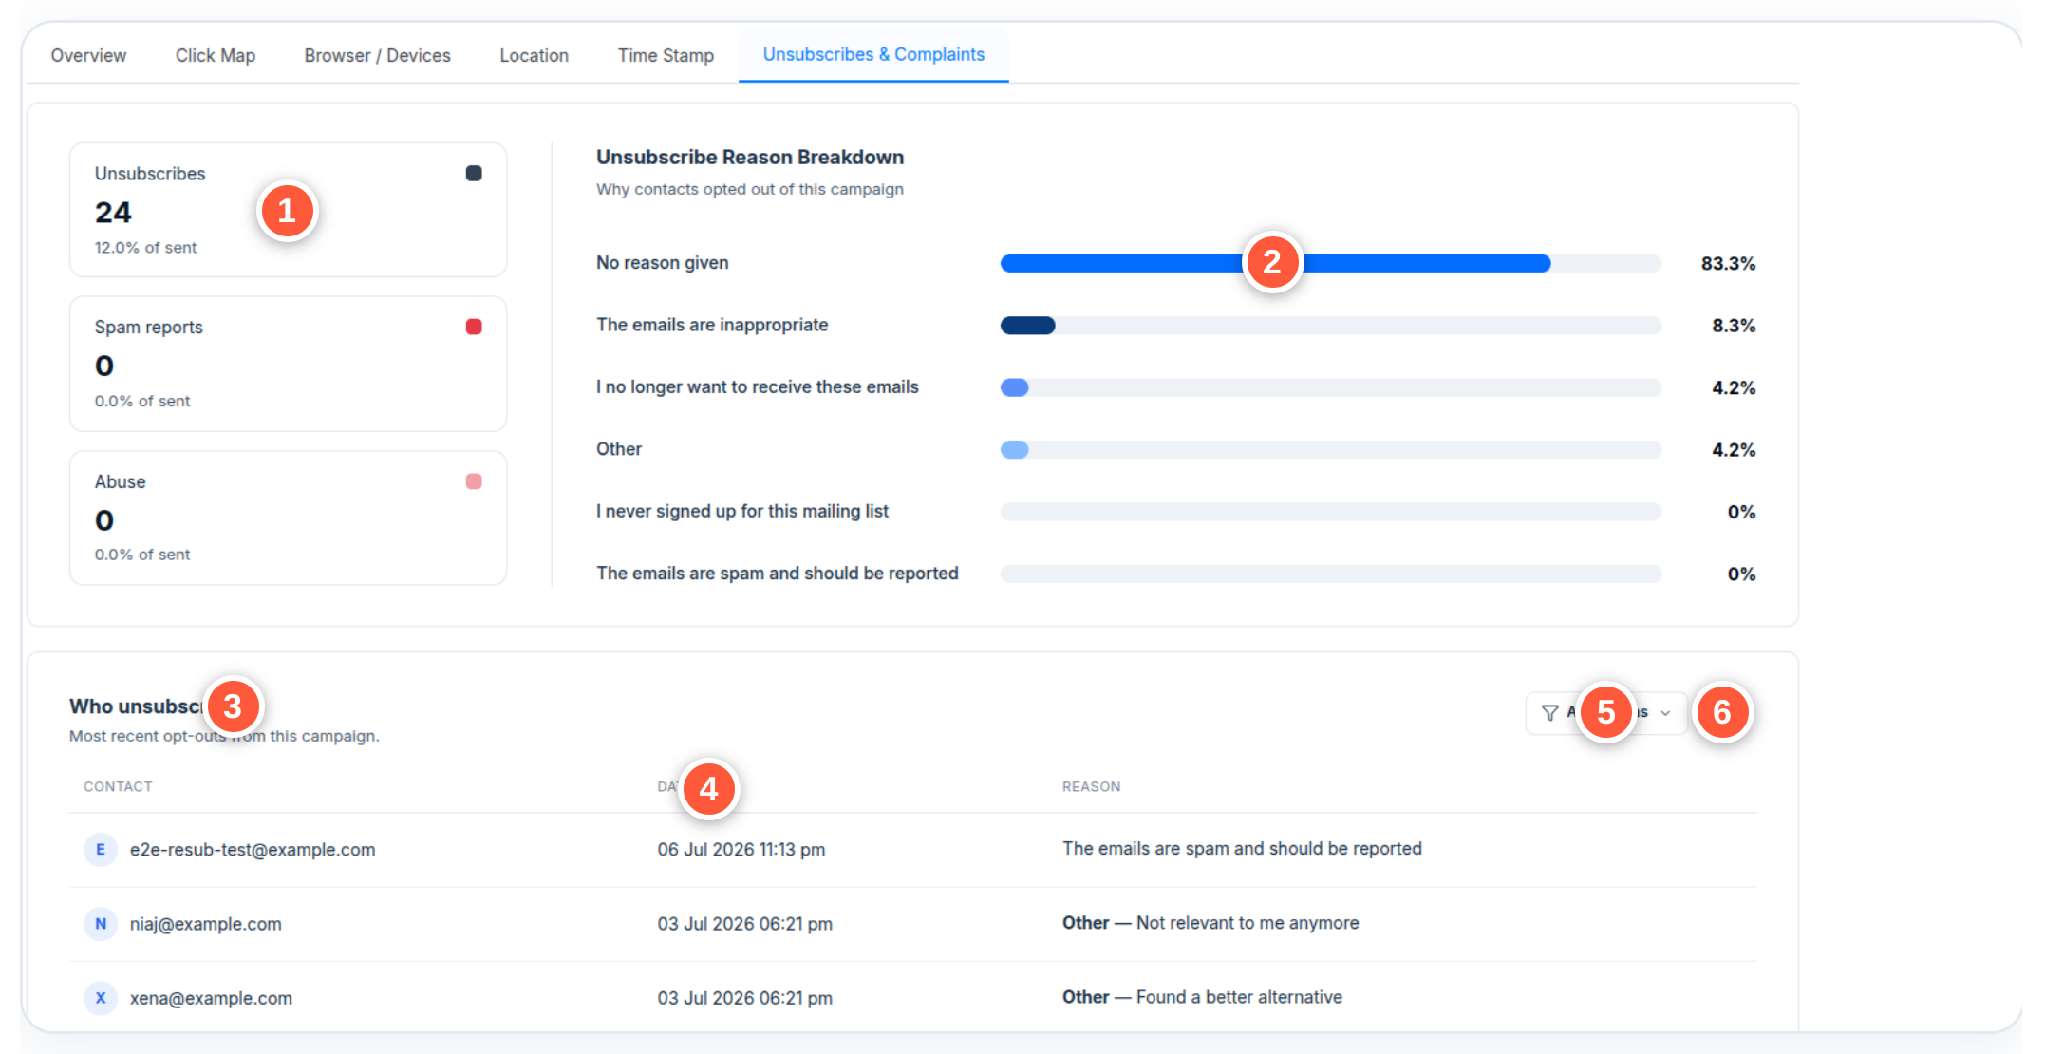
A campaign’s Unsubscribes & Complaints tab — the reason breakdown (top) and the who-unsubscribed list (bottom).
1. Opt-out counters — At-a-glance totals for this campaign: Unsubscribes (with % of emails sent), Spam reports and Abuse.
2. Unsubscribe Reason Breakdown — The share of opt-outs for each reason, sorted highest first. No reason given covers one-click opt-outs where the contact didn’t pick a reason. Percentages are of this campaign’s total unsubscribes.
3. Who unsubscribed — The most recent opt-outs — one row per contact with their email, date and exact reason (free-text “Other” answers are shown in full).
4. Sort by date — Click the Date column header to sort opt-outs newest-first or oldest-first.
5. Filter by reason — Use All reasons to narrow the list to a specific reason.
6. Export — Download the who-unsubscribed list (CSV) for your records or CRM.
The same Unsubscribe Reason Breakdown, aggregated across all campaigns, gives you the big picture of why contacts leave your list.

Reading the reasons
“No reason given” — One-click opt-outs (list-unsubscribe / mailto) where the contact didn’t choose a reason. Often the largest bar — that’s normal.
“Other” — The contact typed a free-text reason. The full text is shown in the Who unsubscribed list (e.g. “Other — Found a better alternative”).
Percentages — Each bar is that reason’s share of the campaign’s total unsubscribes, sorted highest first.
Only enabled reasons appear — Reasons you switched off in the Departure Reason Survey won’t be offered, so tune the survey to the feedback you want.