A suppression list is the set of recipients Mailercloud will not deliver to. When you send to a suppressed address, the message is rejected before it ever leaves the platform — nothing is queued, and nothing reaches the recipient's mailbox provider.
Repeatedly emailing addresses that hard bounced or marked you as spam damages your domain's reputation with mailbox providers. The suppression list manages this for you automatically, while keeping a complete record of every suppressed recipient.
Log in to your Mailercloud account.
Go to the API platform.
Select "Suppressions" from the sidebar.
The list shows your suppressed recipients, with the most recent at the top.
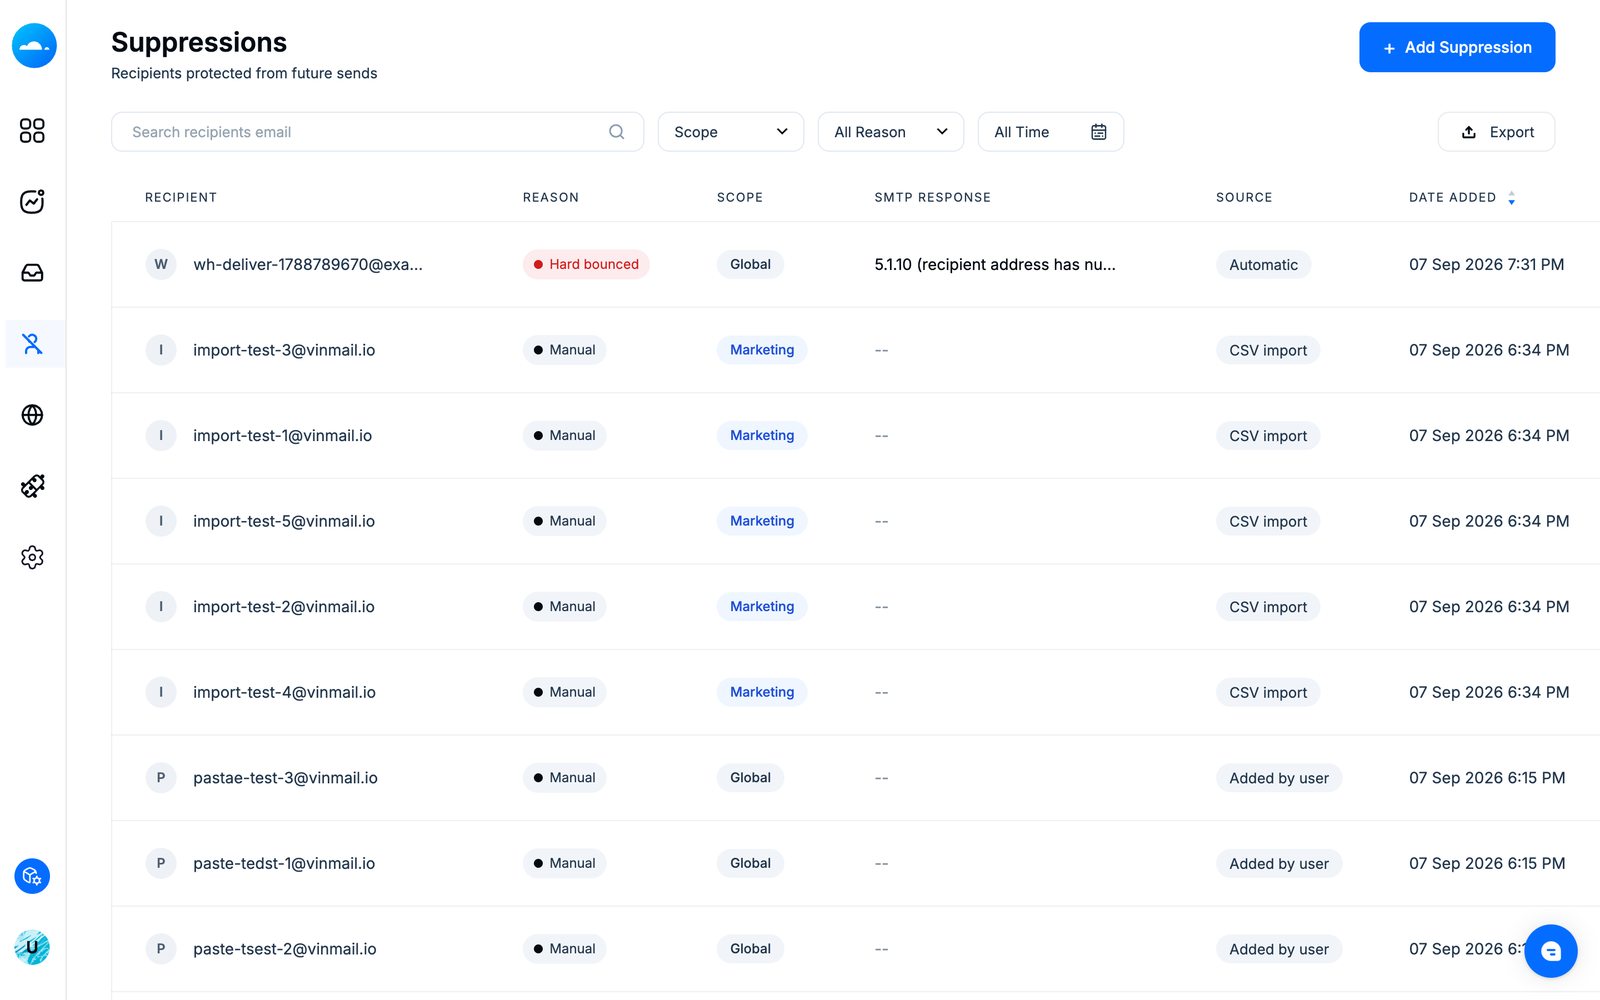
Every suppression entry records a scope — which of your sending streams it applies to:
Global — blocks the recipient on every send. All hard bounces are global, because a mailbox that doesn't exist can't receive any mail, and so is every entry created before scopes existed.
Marketing — blocks only marketing (promotional) sends.
Transactional — blocks only transactional sends, such as order confirmations, password resets and OTPs.
All streams — the address was suppressed on both streams separately.
Spam complaints automatically record the stream they came from. A recipient who complained about a marketing email gets a marketing-scoped entry, so your transactional mail to them — the receipts and password resets they still expect — can keep flowing.
Whether scope affects delivery is controlled by a single account-level setting, in Settings > Suppression:
Account-wide (the default) — any suppression blocks the recipient on every send, marketing and transactional alike. Scope is recorded but not enforced. This is exactly how the suppression list has always behaved.
Stream-scoped — a marketing-scoped entry no longer blocks your transactional sends to the same address, and vice versa. Global entries, hard bounces above all, still block everything.
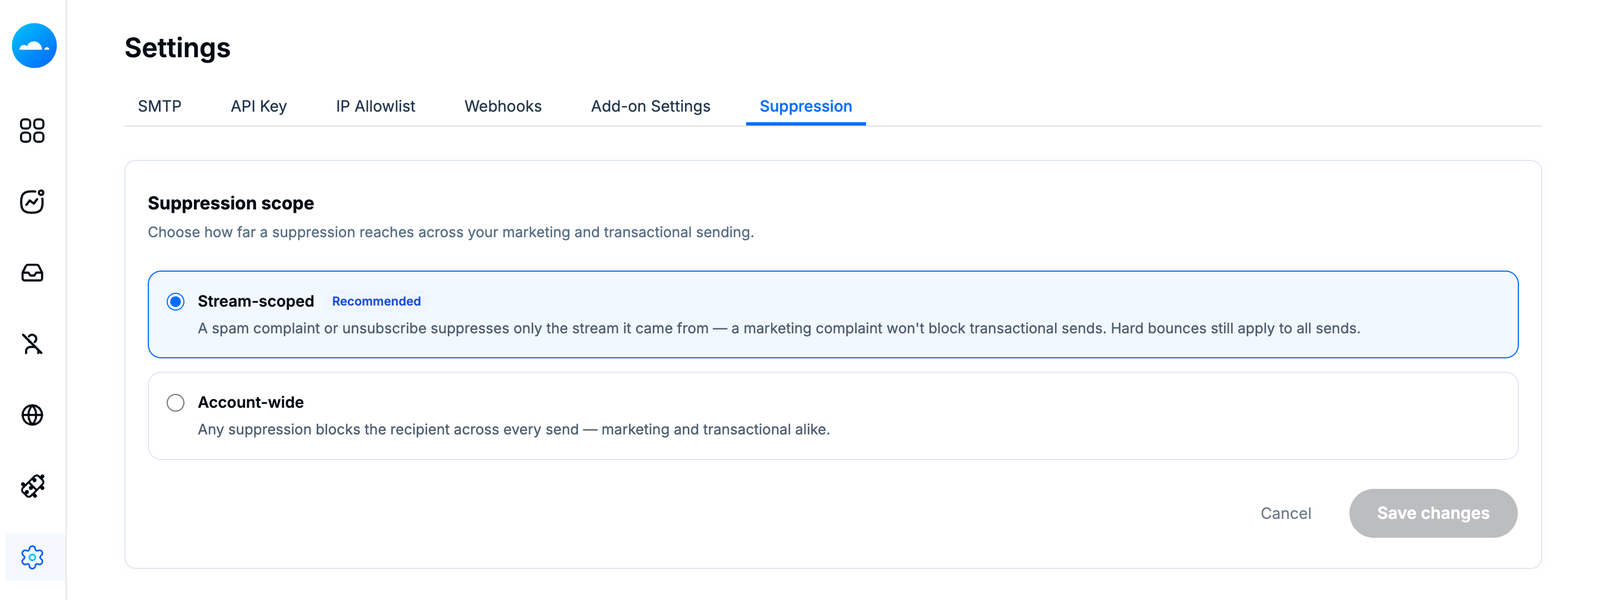
You can switch between the two at any time, and the change applies from your next send. Switching to stream-scoped means recipients who only complained about marketing will start receiving your transactional email again. Switching back is just as instant, because the scope of every entry is always stored, whichever policy is active.
You don't need to configure anything. Mailercloud suppresses a recipient automatically when:
A send hard bounces — the mailbox doesn't exist, or the receiving server permanently refuses it. Hard bounces are always Global.
The recipient marks your email as spam — the complaint records the stream it was earned on, so it is scoped to marketing or transactional accordingly. If the originating stream can't be determined, the entry is global, because a complaint should never block less than it should.
Soft bounces, deferrals and other temporary failures do not suppress a recipient.
Note: The dates on automatic entries match the corresponding events in your Activities log.
Use this when you already know an address should never receive mail — an unsubscribe handled offline, a role account, or a complaint raised directly with you.
Click "+ Add Suppression" and choose "Add Manually".
Enter the addresses, one per line.
Pick a Scope for the batch — Global (the default), Marketing or Transactional. The scope applies to every address in the batch.
Click "Add Suppression".
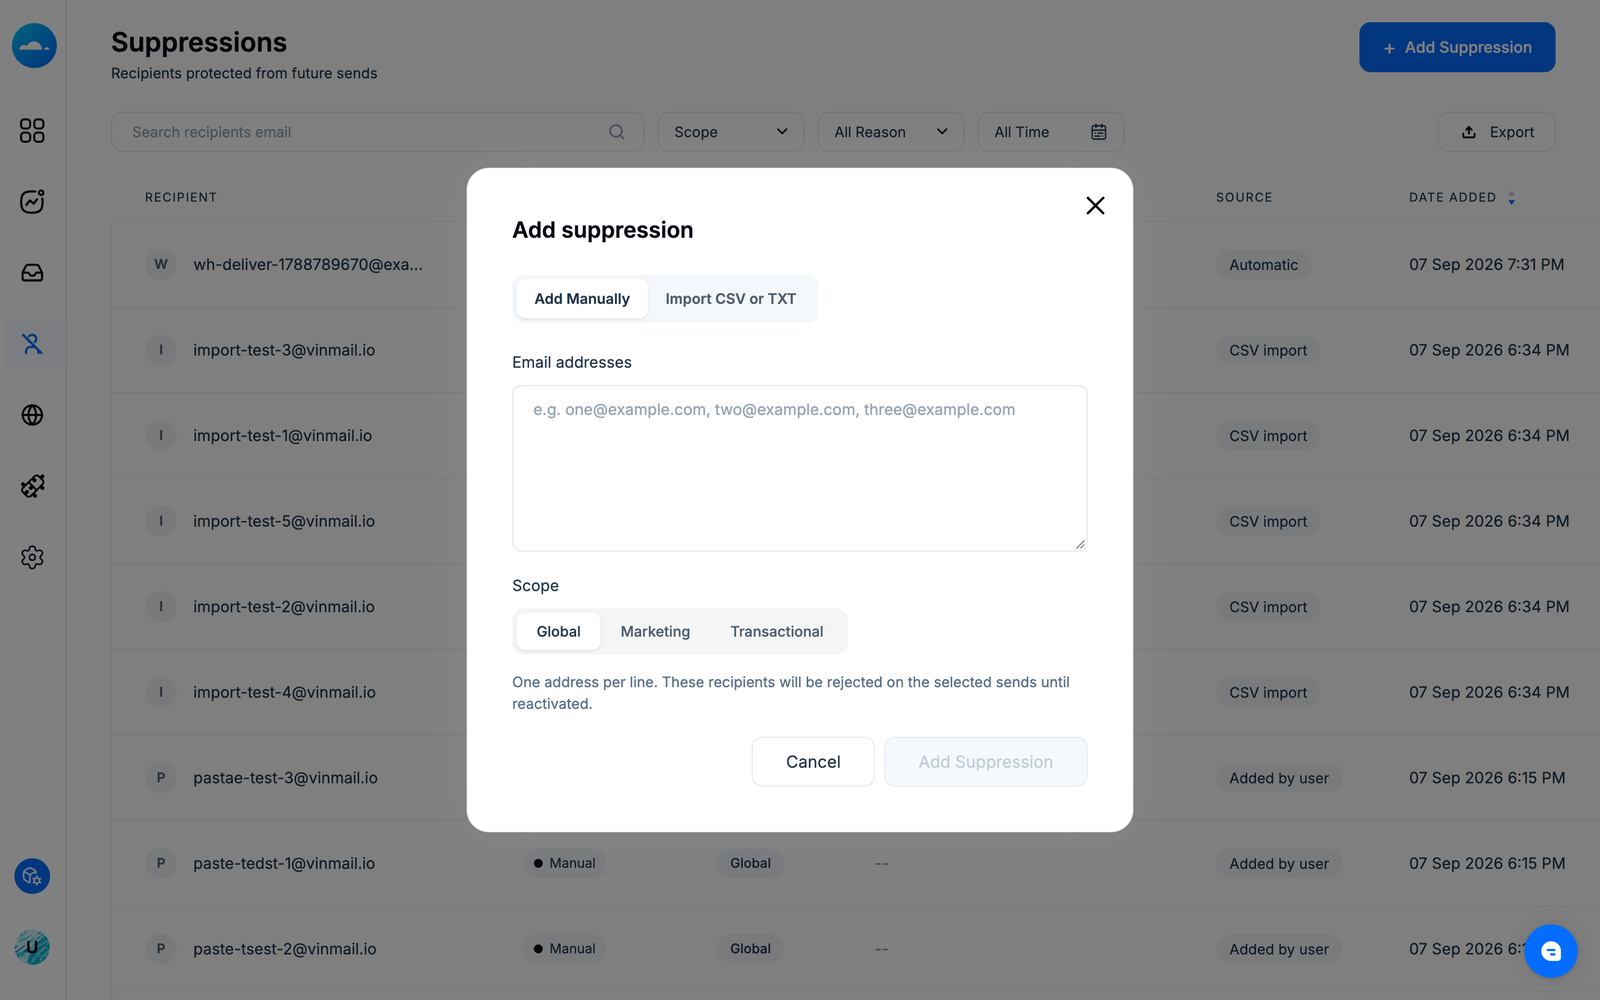
The addresses appear on the list immediately with the reason "Manual", and take effect on your next send.
Note: A scoped entry only changes what is delivered once your account's policy is stream-scoped. Under the default account-wide policy, every entry blocks all sends.
If you are moving from another provider, or you keep your own do-not-contact list, you can import it in bulk.
Click "+ Add Suppression" and choose "Import CSV or TXT".
Drag your file in, or click to browse.
Pick a Scope for the whole file — it applies to every address in the import.
Review the parsed addresses and click "Upload file".
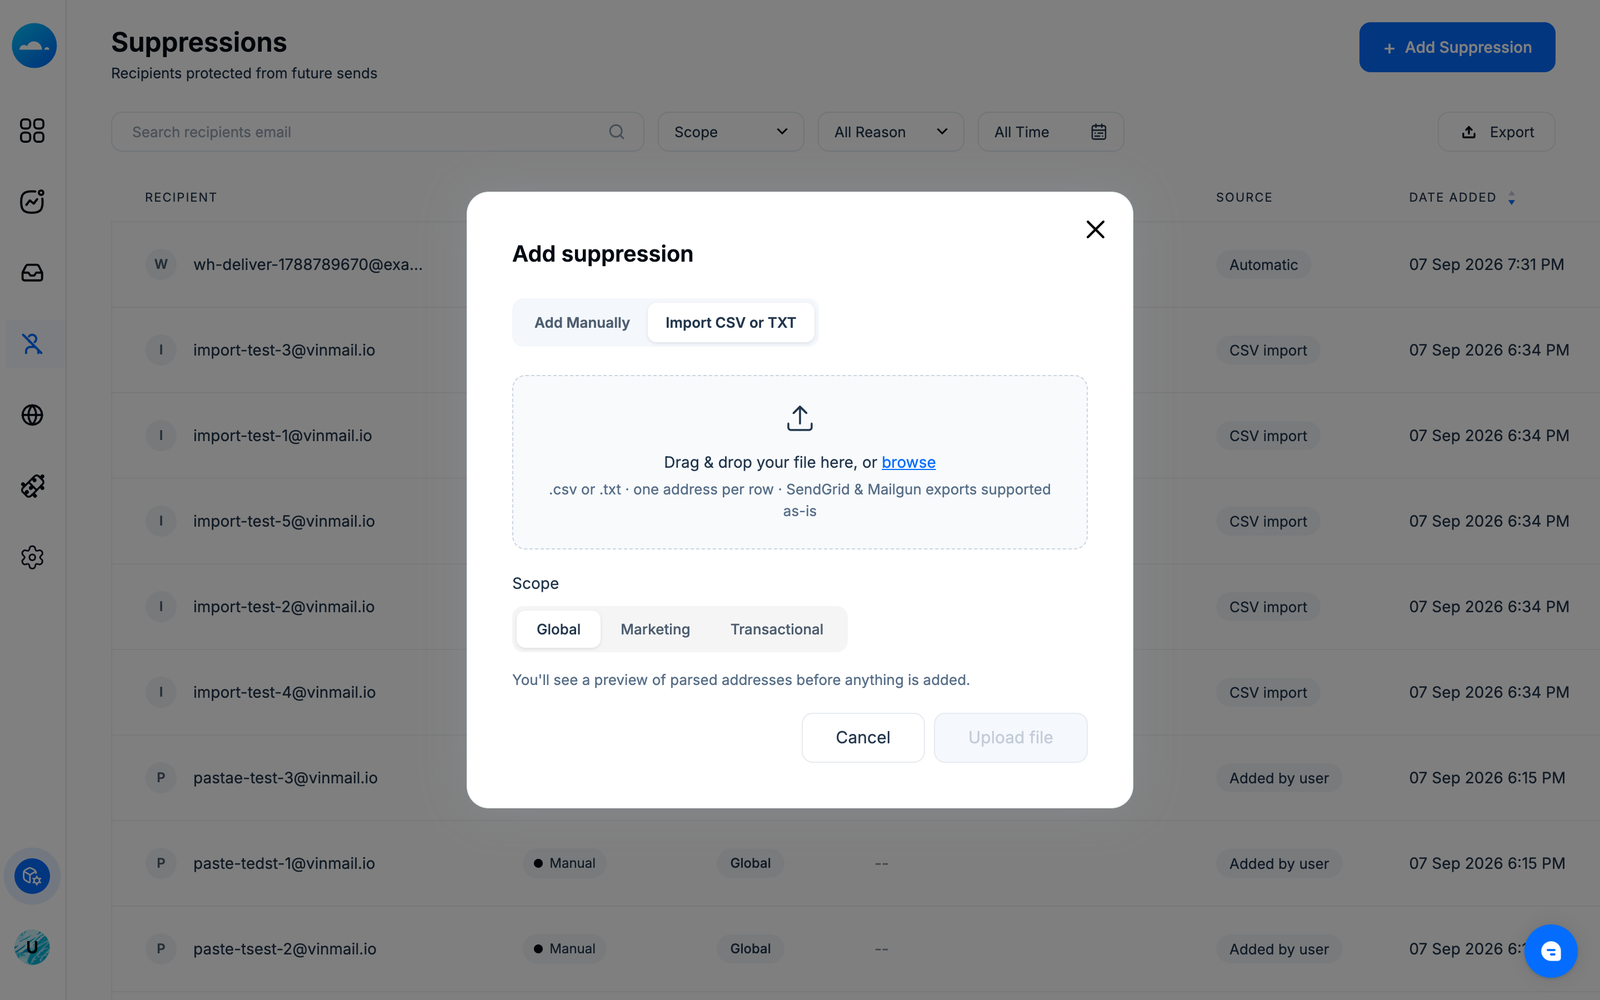
Files must be .csv or .txt with one address per row. Files with extra columns are accepted, because only the email address is read.
The import runs in the background, and you'll receive an email when it completes showing how many addresses were added, how many were already suppressed, and how many rows couldn't be read.
Note: Only one import can run per account at a time.
Combine any of these controls:
Search — matches any part of an email address.
Reason filter — narrows to one reason, with counts for each.
Scope filter — narrows to one or more scopes (Global, Marketing or Transactional). The badge on the button shows how many scopes are selected.
Date range — limits the list to when recipients were suppressed.
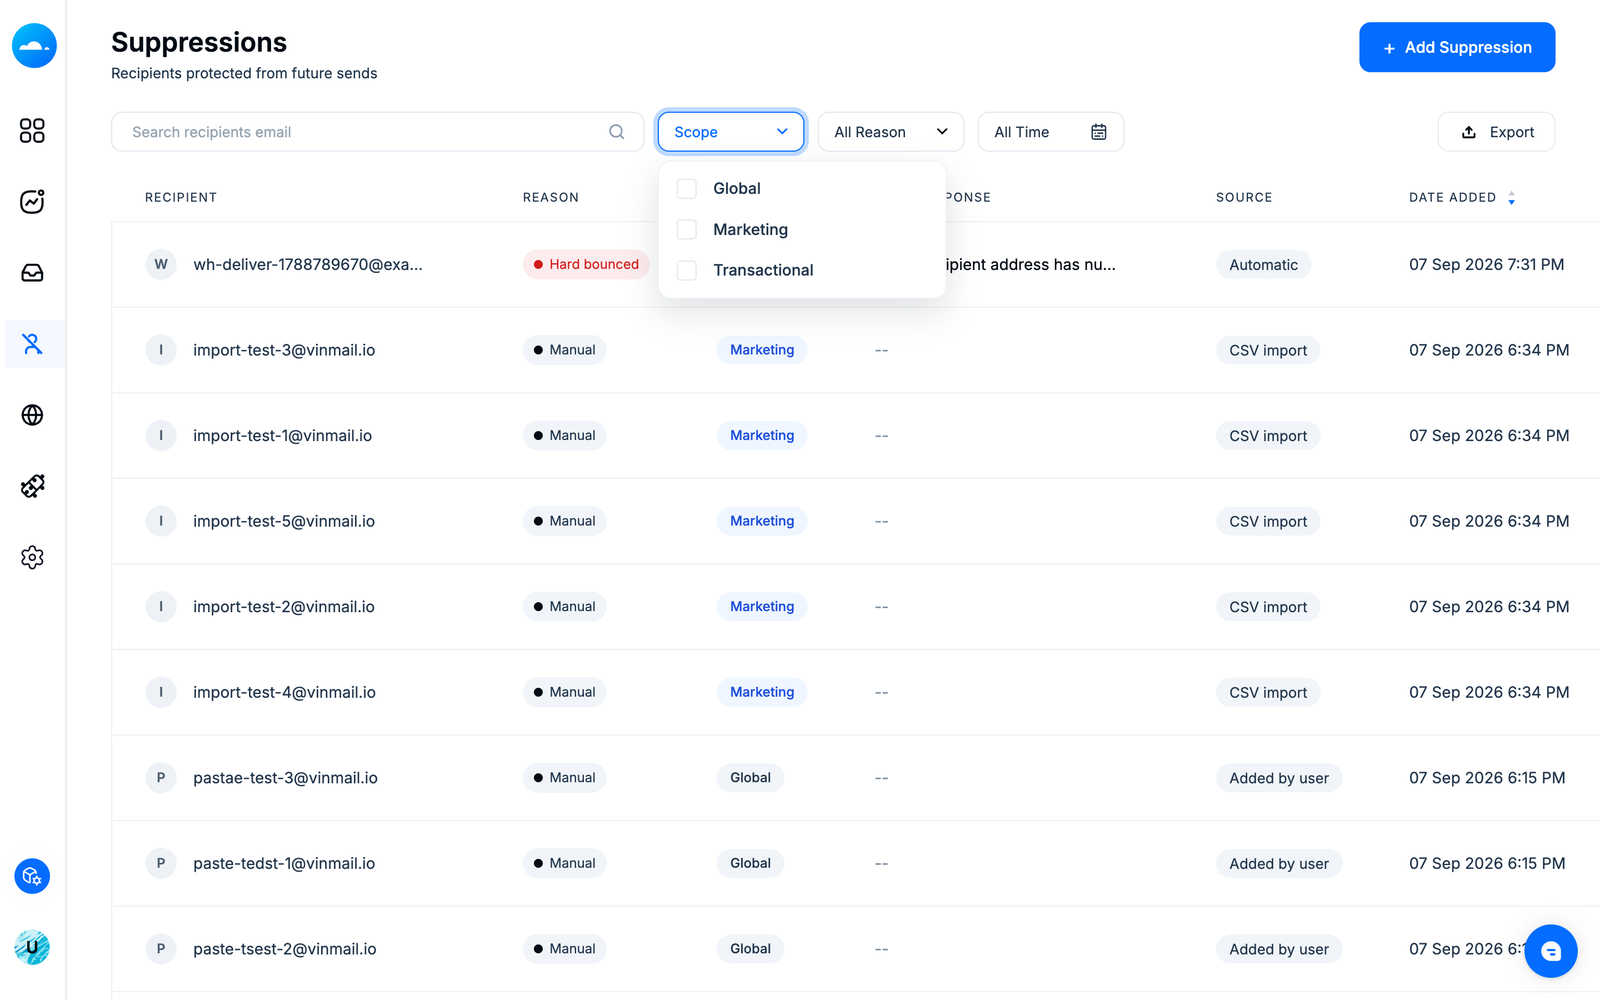
You can also sort by "Date added" using the column header, and page through long lists.
Click "Export" and the list is delivered to your email as a CSV. Any search, filters — including the scope filter — and date range you have applied are included in the export, which also carries each entry's scope.
Reactivating removes an address from the suppression list so that it can receive mail again.
Find the recipient using search or the filters.
Click "Reactivate" on their row.
The recipient is removed from the list immediately, and receives mail normally from your next send. Reactivation clears the whole address in one action — every reason and every scope it was suppressed under.
Note: Recipients suppressed by a spam complaint show "Contact support" instead of a Reactivate button. That recipient asked their mailbox provider to block your mail, so removing them is handled by our support team.
Everything on this page is also available programmatically with your API key, including scope. Pass "scope" when adding suppressions, filter with "scopes" when searching, and every returned entry carries its scope.
For the endpoints and parameters, see the Mailercloud API reference.
A rejected message appears in your Activities log as a rejection. The API still returns success for the request, because suppression is enforced per recipient, and on a multi-recipient message only the suppressed recipients are dropped — everyone else receives it normally, with no delay.
Under a stream-scoped policy, the rejection depends on the send: a marketing-scoped entry rejects your marketing sends to that address, while your transactional sends deliver.
Access to the suppression list is controlled by role, at three levels:
View Suppressions — open the page, search, filter and export.
Manage Suppressions — add recipients manually and import files. Managing also covers the suppression policy setting.
Reactivate Suppressed Recipients — remove addresses from the list.
If you can't see or change something here, contact your account administrator. And if anything about your suppression list looks wrong, contact our support team through the chat widget in your account — we're happy to help.