Webforms let you collect signups directly from your website and add them straight to a Mailercloud contact list. You can build a form with Mailercloud AI, import one from an existing page, or create one from scratch or a template. Every form type can collect any of your contact fields, arrange them freely, and looks the same in the builder, the preview, and on your live site.
You need a contact list to connect the form to. If you don’t have one, create it under Audience first.
Any custom fields you want to collect should exist under Account > Contact properties. You can also create a new field from inside the builder.
To publish a form on your website, you should be able to paste a snippet of code into your website’s HTML, or use your site builder’s “custom code” feature.
The quickest way to build a form is to describe it, and Mailercloud AI builds it for you — fields, copy, layout, and display rules.
Go to Audience > Webforms from the left menu and click Create Form. The first thing you’ll see is Describe your form.
Type a description of the form you want. Be specific about the form type, what you’re collecting, and when it should appear. For example: “A pop-up newsletter signup for a bookshop, collecting email and first name, shown after 8 seconds.”
Or click one of the suggestion chips to start from a common use case: Newsletter signup, Contact form, Event RSVP, Feedback/NPS, or Lead-magnet download.
Click Generate now.
Your form opens straight in the builder, named for what you described and ready to edit.
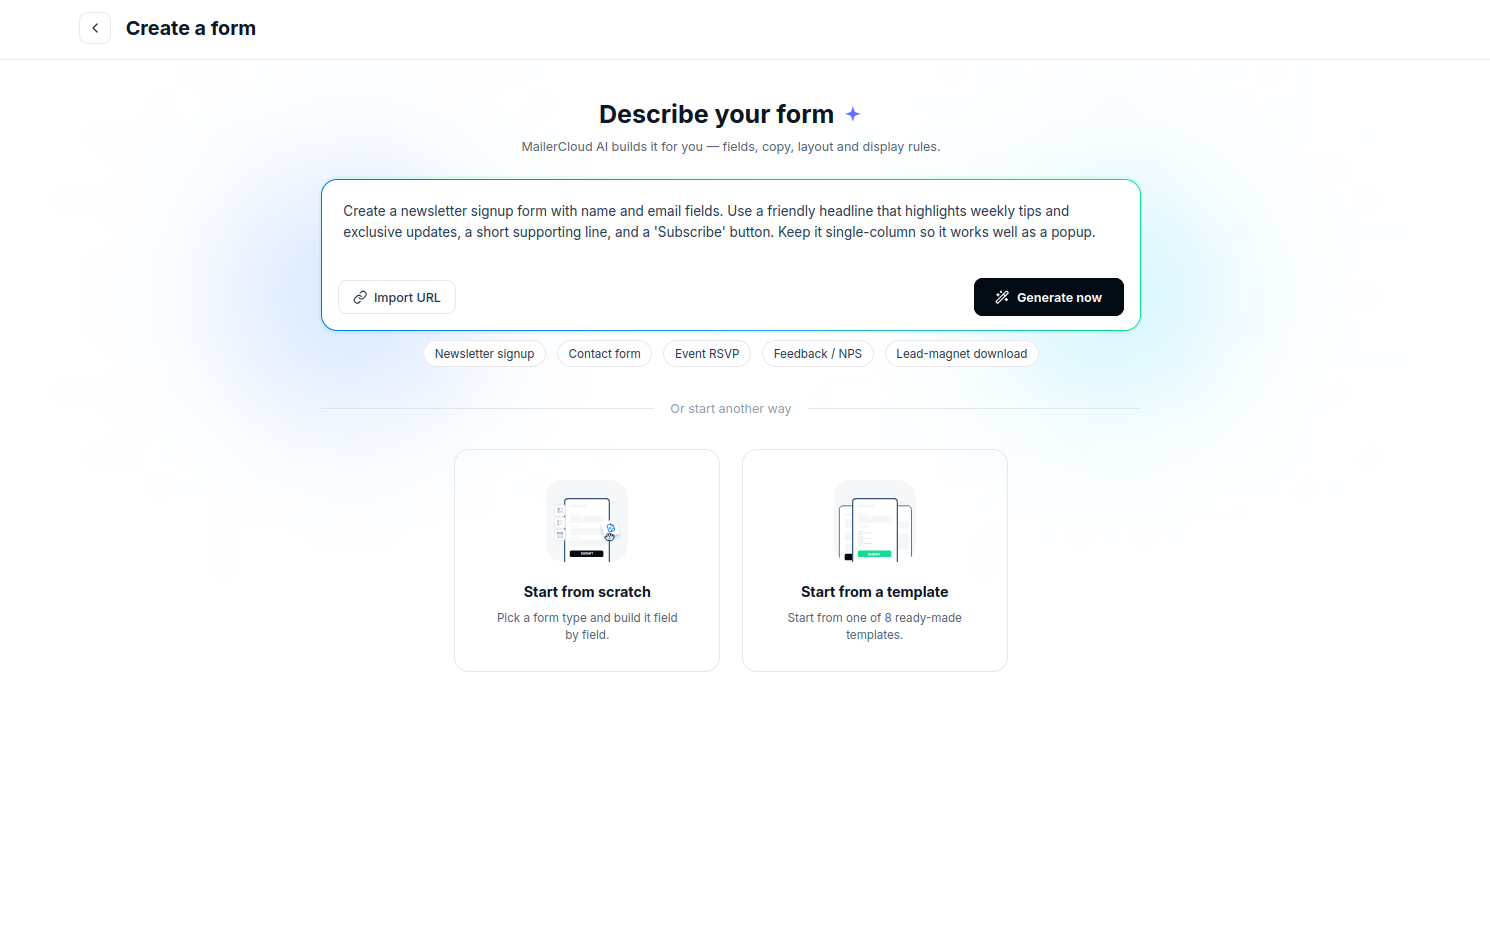
Tip: The more detail you give, the less you’ll need to change afterwards. Always mention the form type (pop-up, banner, embedded) — it can’t be changed once the form exists — along with the fields you want and any timing or targeting, such as “shows on exit intent”, “only on the pricing page”, or “mobile only”.
Note: You can generate up to 5 forms a day with AI, and your description can be up to 2,000 characters. The daily allowance resets at midnight UTC, and only successful generations are counted. Importing from a URL doesn’t use this allowance.
Everything the AI creates is a starting point. Open any section of the builder to rename fields, add or remove them, rewrite the heading and body, restyle the form, or adjust the display rules — the generated form behaves exactly like one you built by hand.
If the form you want already exists on another page — on your old website, or a page you’re migrating — you don’t have to rebuild it by hand.
On the Create a form screen, click Import URL.
Paste the link to the page that contains the form, for example https://example.com/contact.
Click Import form.
Mailercloud reads the fields on that page, rebuilds them, and opens the new form in the builder. You’ll see a confirmation of how many fields were brought across — for example, “Added 7 fields”.
Field types are preserved wherever they can be matched. Importing a page with a name, phone, email, a set of radio buttons, a dropdown, and a comments box produces the same mix in Mailercloud: single-line text fields, a radio field, a dropdown, and a multi-line text field.
A few things to know about imported forms:
They’re created as an Embedded form. If you need a pop-up or banner instead, create that form separately — a form’s type is fixed once it’s created.
They’re named after the source, for example “Form from example.com”. Rename it from the title at the top of the builder.
An Email field is always added and required, even if the original page didn’t ask for one — Mailercloud needs it to create the contact.
Labels come from the source page’s field names, so they may need tidying (“Custname” → “Your name”).
Note: An import brings across the fields, not the original page’s styling, and complex or unusual inputs may come through as a close equivalent rather than an exact match. Review the fields after importing, then use the Design section to match your brand.
Under Or start another way, you’ll find two alternatives:
Start from scratch — pick a form type and build it field by field.
Start from a template — begin with one of 8 ready-made templates.
If you choose Start from scratch, you’ll be asked to pick a type. When you generate with AI, the type is chosen from your description — so mention which one you want.
Note: A form’s type is set when it’s created and can’t be changed afterwards. If you need the same form as a different type, create a new form and rebuild it — or duplicate the form you have and pick the type you want.
Type | Where it appears | Best for |
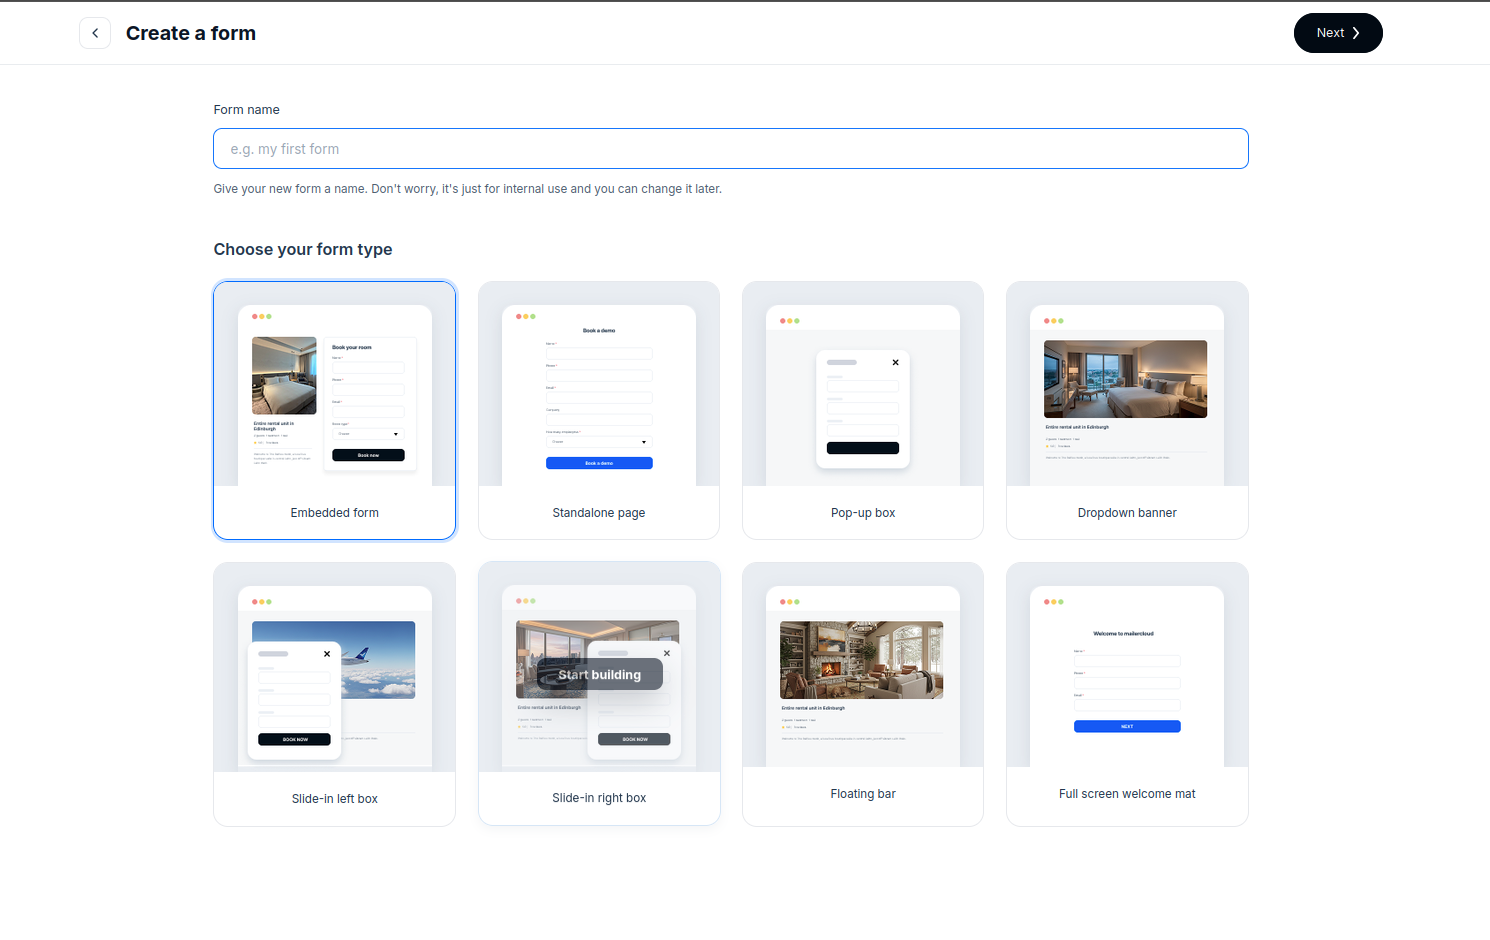
The builder has five sections in the left rail: Fields, Setup, Design, Display, and Settings. The form itself is on the right and updates as you work.
Pick a design layout. For overlay forms, choose one of the four layouts at the top of the Fields section — plain, image beside the text, image on top, or heading with image and description.
Write your heading and body. Use the Form heading and Form body editors. You can bold, italicise, underline, align, add links and lists — what you type is exactly what your visitors see.
Set the button text. Enter what the submit button should say, for example, “Subscribe now”.
Add your fields. Open the Add form field panel and click or drag the fields you want.
Arrange them. Drag fields into the order you want, and side by side where it helps.
Choose the list. In Settings, pick the contact list new subscribers should join.
Preview and publish. Click Preview to see the form as visitors will, then click Publish.
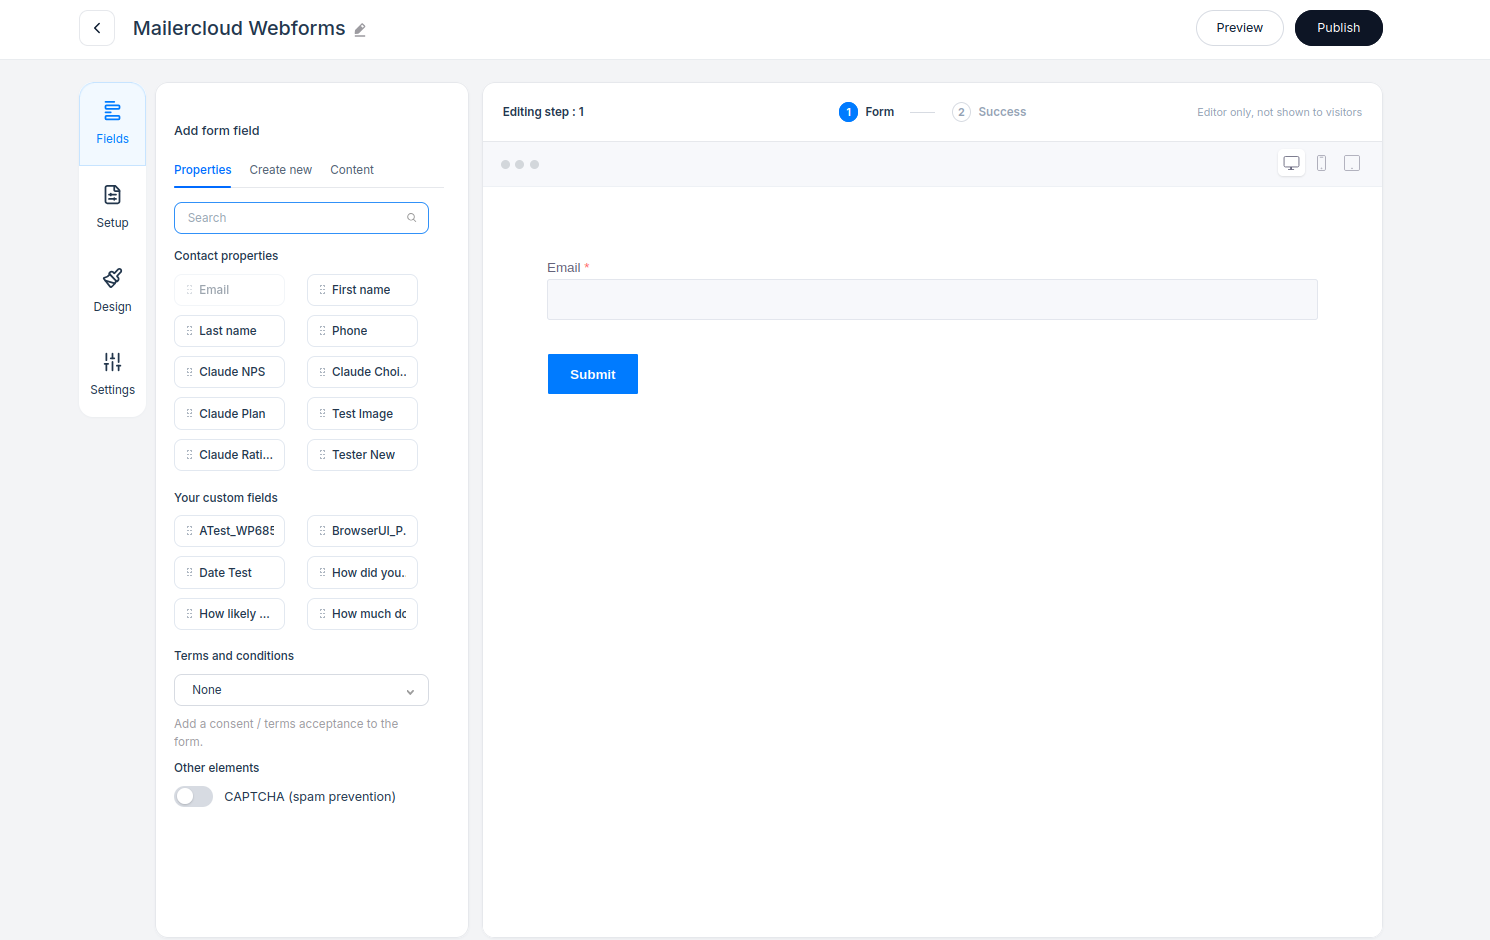
The Add form field panel has three tabs:
Properties — your existing fields, split into Contact properties (the standard ones like first name, last name, phone) and Your custom fields. Use the search box to find one quickly.
Create new — build a field that doesn’t exist yet.
Content — layout and decoration blocks that don’t collect answers.
Click a field to add it to the end of the form, or drag it onto the form to drop it exactly where you want. Fields already on the form appear greyed out so you don’t add them twice. The email field is always present and can’t be removed.
Hover over a field on the form and use the move handle, or simply drag the field. As you drag, a blue line shows where it will land — release to drop it there.
Drag a field to the left or right edge of another field. When the blue line appears vertically beside it, drop it — the two fields now share a row. First name and last name work well this way. A row holds up to three fields.
Tip: Shorter forms convert better. Ask for the email address plus only the one or two details you’ll actually use in your campaigns.
Click any field on the form to open its settings. You can change the label, add placeholder text, mark it required, or make it hidden. Option-based fields (dropdown, radio, image choice) also let you manage their options here.
Hover over the field and click the delete icon, or use the × beside its name in the Form fields list in the left panel.
Under Create new, you can add:
Single line text — names, job titles, short answers
Multiple line text — comments and longer answers
Numbers — quantities, ages, numeric values
Dropdown — one choice from a list
Radio — one choice, all options visible
Single check box — a yes/no or consent tick
Date picker — birthdays, event dates
Star rating — a 2 to 10 star scale
Scale/NPS — a fixed 0 to 10 Net Promoter Score scale
Image choice — pick one of several images
When you create a field, you give it a label and a personalization tag so you can use the answer in your campaigns later.
Blocks add structure and personality to your form. They don’t collect answers. Open the Content tab and click or drag one in:
Header text — a heading between sections of the form
Paragraph — explanatory text, terms, reassurance
Image — a picture, logo, or product shot
Divider — a horizontal line to separate groups of fields
Section — a collapsible group
Page break — splits a long form into steps
Note: Page break and Section aren’t available on dropdown banners and floating bars, because those form types are a single compact strip.
Open the Design section to style every part of the form. Changes apply live to the preview.
Styles — pick one of the ready-made looks as a starting point.
Form styles — width, font family, background, and corner treatment.
Fields — label and input colours and sizes.
Buttons — colour, text colour, size, and alignment.
Background — a background colour or image for the form.
Terms & conditions — styling for your consent text.
The font you choose here applies everywhere — the text editors in the builder, the canvas, the preview, and the published form all render it the same way.
Open the Setup section and choose one of two outcomes:
Thank you message — write a heading and a message. You can format the message with bold, italics, links, and lists. Check it on the Success screen above the form.
Redirect to — send people to a URL of your choice, for example, a thank-you page or a discount code.
The Settings section holds everything about where submissions go:
Contact list — the list new subscribers are added to.
Tags — tags applied to every contact from this form. Useful for telling signup sources apart later.
Enable double opt-in — sends a confirmation email, and only adds the contact once they confirm.
Prevent duplicate submissions — blocks repeat entries from the same address, with a warning message you can word yourself.
Notifications — email your team when the form is submitted.
Anti-spam — turn on CAPTCHA to keep bots out.
Pop-ups, banners, bars, slide-ins, and welcome mats have a Display section that controls when they appear. All active rules must match before the form shows.
When it shows — on page load after a delay, on exit intent, at a scroll depth, or after a period of inactivity.
How often — cap how many times a single visitor sees it.
Who sees it — everyone, or narrowed by device (mobile, desktop).
Where it shows — include or exclude specific URLs. Use * as a wildcard.
Advanced targeting — show or hide by country.
Tip: Exit intent plus a repeat cap is a good default for a first pop-up — it catches people about to leave without nagging returning visitors.
Click Preview to open the form exactly as a visitor will see it. Check it on desktop and mobile using the device icons above the canvas.
Click Publish (or Update for a form you’ve published before).
On the publish screen, you’ll find two options:
Share link — a hosted page you can send anywhere: social posts, email, QR codes.
Embed code — a snippet to paste into your website.
Copy the embed code and paste it into your site’s HTML, just before the closing </body> tag. Embedded forms also need the placeholder <div> from the snippet where you want the form to appear.
If you are updating a form that was already on your site, replace the old snippet with the one you just copied — don’t leave the previous code in place.
Important: Publishing creates a new version of your form, and your embed code contains that version number. Whenever you edit a published form, two steps are needed for visitors to see the change:
Click Update to publish the new version.
Copy the updated embed code from the publish screen and replace the old snippet on your website.
If you skip the second step, your site keeps loading the previous version of the form and your changes won’t appear. The share link works the same way — use the link shown after publishing.
Overlay forms are rendered directly on your page, so they can be affected by your site’s own styling. The builder guards against this: fonts, colours, spacing, buttons, and the star, scale, and image-choice widgets keep the design you chose, even on themes with strong global styles.
A few other things are handled for you:
Pop-ups fit narrow browser windows and mobile screens without cutting off fields.
Long forms scroll inside the pop-up rather than overflowing the screen.
Input text is sized so mobile browsers don’t zoom in when someone taps a field.
The webform list shows three numbers per form:
Views — how many times the form was displayed.
Submissions — how many times it was submitted, and the conversion rate against views.
New contacts — how many submissions came from people who weren’t already in your audience.
These are lifetime totals. Editing and republishing a form doesn’t reset them.
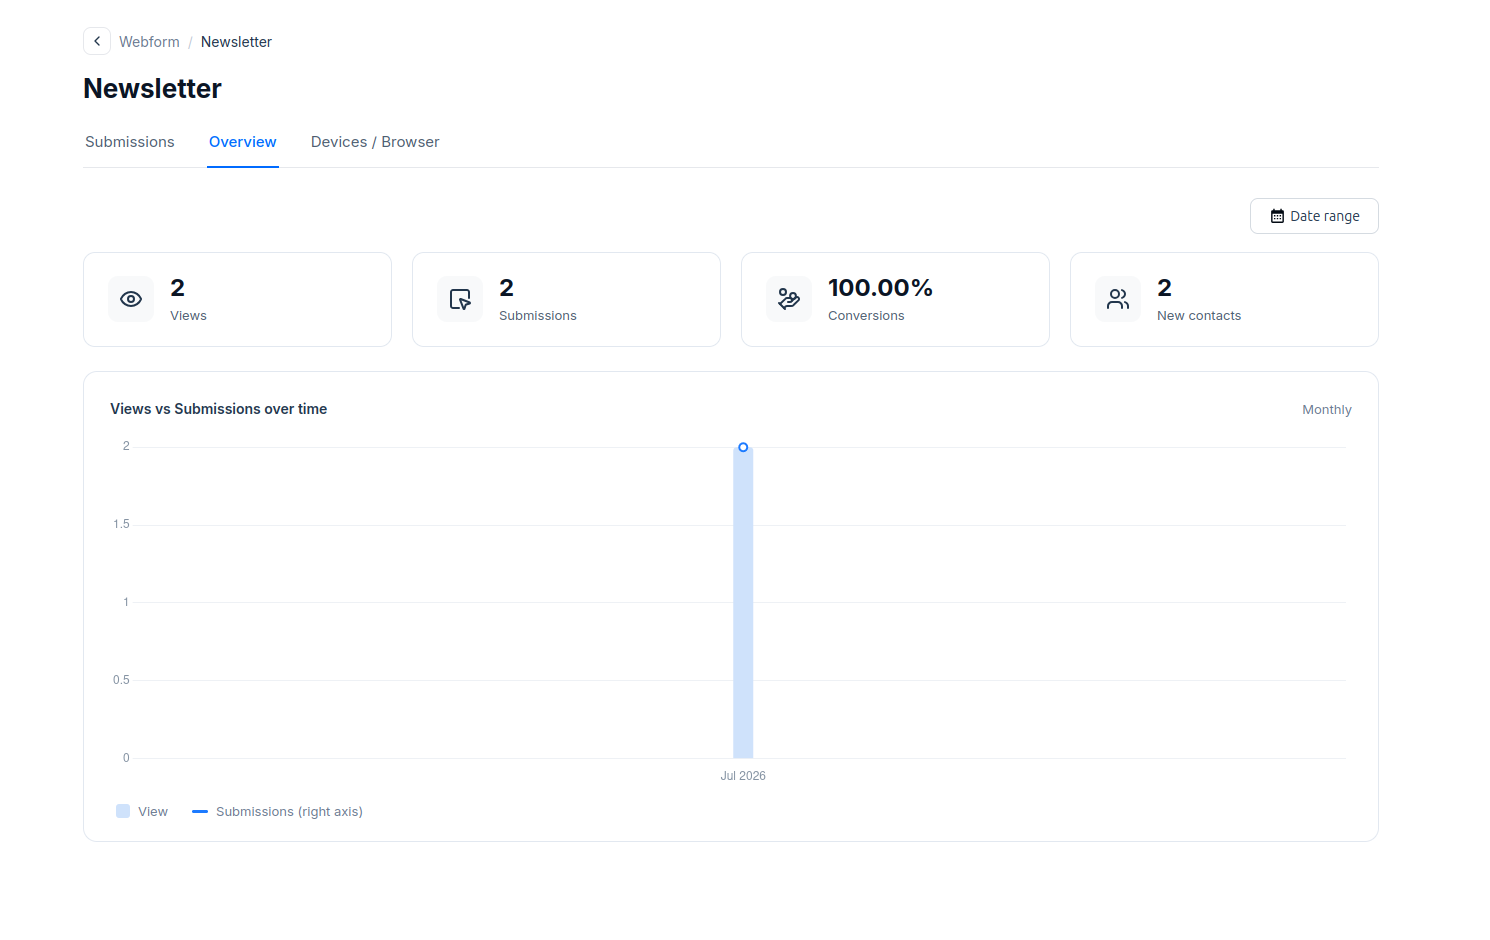
The same figures are available from the Webform List endpoint, POST /v1/webform/search. Each form returns view_count, submission_count, and new_contact_count, and you can sort by any of them. See the API reference for the full request and response.
The email field is required on every form and can’t be removed.
A row can hold up to three fields side by side.
Content blocks are full width — they don’t sit beside a field.
Free plan: you can have 1 webform. Paid plans are unlimited. If you’re on the Free plan and already have a form, creating another (including with AI) shows “Your Free plan includes 1 webform. Upgrade to create more forms.”
AI generation: up to 5 generated forms per day per account. The allowance resets at midnight UTC, and only successful generations count — if a generation fails, it isn’t deducted.
AI prompt length: up to 2,000 characters.
The daily AI limit applies to the Describe your form generator only. Import URL isn’t capped.
Draft forms aren’t live. A form must be published before its share link or embed code will work.
Can I change a form's type after creating it? No. A form's type (embedded, pop-up, banner, floating bar, slide-in, welcome mat) is fixed when it's created. Create a new form — or duplicate the existing one — and pick the type you want.
Why aren't my changes showing on my website? Publishing creates a new version, and your embed code contains that version number. After clicking Update, copy the updated embed code from the publish screen and replace the old snippet on your site. Until you do, visitors keep seeing the previous version.
Can I remove the email field? No. The email field is required on every form and can't be removed — Mailercloud needs it to create the contact.
Does Mailercloud limit the number of webforms on the Free plan? Yes. The Free plan includes 1 webform. If you already have a form and try to create another — including with AI — you'll see "Your Free plan includes 1 webform. Upgrade to create more forms." All paid plans include unlimited webforms. Separately, AI form generation is capped at 5 successful generations per day on every plan.
How many webforms can I create on a paid plan? There's no limit — every paid plan includes unlimited webforms. The only cap that applies on any plan is AI generation: up to 5 successfully generated forms per day.
Does editing a form reset its stats? No. Views, submissions, and new contacts are lifetime totals — editing and republishing doesn't reset them.
Does the Import URL option copy the design of the original form? No. An import brings across the fields, not the original page's styling. Use the Design section to restyle the form to match your brand.